Travel organization · RESEARCH-BASED BUYING GUIDE
Choose Flat Organizers for a Shallow Personal Item
A shallow bag can feel smaller after you add a thick organizer with rounded walls. For this packing problem, flat pouches often make more sense than miniature boxes. The right arrangement leaves the bag comfortable to carry and keeps essentials accessible without assuming any universal airline personal-item size.
As an Amazon Associate I earn from qualifying purchases. We have not hands-on tested the products discussed in this guide.
Measure the constraint that matters
Empty your bag and measure usable depth near its closure, not just the broad base. Fill a soft pouch with the actual accessories and check the resulting thickness. Lay that pouch inside the bag beside your notebook or other flat item. If closing the bag bends the notebook or pushes the outer pocket outward, reducing the kit is more useful than searching for an organizer with a bigger capacity claim.
Arrange layers by frequency
Put seldom-used flat items nearest the back and the everyday pouch near the opening. Keep irregular hard objects away from the side that rests against your body. A small pouch of cables may fit better upright along an edge than directly on top of a book. Rehearse removing the item you need first. If everything must come out to reach it, the packing order needs another attempt.
Avoid unnecessary padded walls
Padding is valuable for an object that needs it, but padding every compartment consumes depth quickly. Use an individual protective case for glasses or a device, then choose a lighter surrounding pouch. Mesh improves visibility while offering limited separation from spills. A flat document sleeve and a soft accessory pouch give you different functions without pretending that one container provides every type of protection.
Validate the loaded bag
Close the bag normally and carry it around the house, then remove and replace the essentials several times. Check the current dimensions required by your actual carrier with the bag loaded, including protrusions. Your existing pencil case or reusable zip bag may pass this exercise. Replace it only if the opening, thickness or durability is genuinely inconvenient over repeated trips.
Compare the practical approaches
| Layout | Works well when | Main benefit | Main cost | Home check |
|---|---|---|---|---|
| One thick accessory pouch | Most accessories are used together at a desk. | A single module is easy to lift out. | The central bulge may press against flat papers or the bag closure. | Close the bag normally and look for pressure rather than forcing the zipper. |
| Two flat pouches | Papers and small flexible accessories need different access. | You can arrange the layers around the bag's usable depth. | Stacking both behind a notebook can still block retrieval. | Remove the frequently used pouch without lifting the notebook. |
| Edge-positioned soft kit | A narrow side space remains beside a flat item. | It uses a gap instead of thickening the entire bag. | Hard objects can create a pressure point against your body. | Carry the loaded bag and check the contact area at the edge. |
| Existing internal pockets | The bag already has suitable shallow compartments. | No added pouch walls or extra zippers. | Small things may migrate if the pockets are deep or open. | Assign a home to each item and repeat the retrieval after normal carrying. |
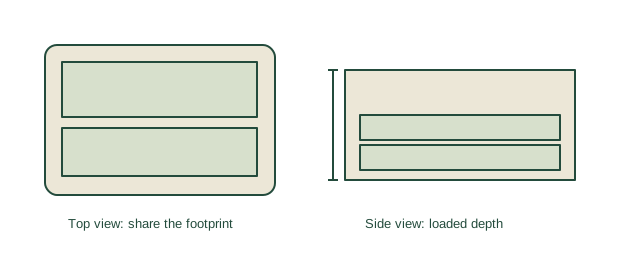
Illustrative measurement exercise: the closing edge is the constraint
Consider an imaginary bag with 10 cm of comfortable usable depth near its opening. This number is invented solely for the exercise; it is neither a product measurement nor an airline limit. The traveler wants to place a 2 cm notebook stack behind a loaded organizer that reaches 7 cm at its center. Although the simple sum is 9 cm, that arithmetic leaves little room for seams, the bag's shape and the act of inserting or removing the organizer.
They make two soft mockups from existing clean pouches: one for papers and one for coiled cables. Instead of stacking both over the notebook, they put the cable pouch along an available edge. Then they close the bag, carry it around the house and retrieve the notebook. If a hard connector now presses against their side, they change the edge position or reduce the kit. A different layout is successful only if both normal carrying and retrieval remain comfortable.
Finally, they measure the outside of the fully packed bag, including bulges and protruding handles, and compare that result with the operating airline's current guidance for the booking. A home fit inside the bag does not prove underseat fit. Different aircraft, seat positions and operator restrictions can affect available storage; ask the airline when its published information does not resolve your specific case.
Map depth, access and the loaded outer shape
- Write down the narrowest usable opening and the comfortable internal depth of your own empty bag. Mark curved corners and lining pockets that reduce usable space.
- List the flat items and irregular objects separately. Give delicate objects appropriate individual protection before experimenting with the surrounding layout; do not remove protection simply to make the sketch look thinner.
- Measure each loaded pouch at its thickest point and sketch a front-to-back layout. Note which item is retrieved most often and keep its opening reachable.
- Carry and open the complete arrangement several times. Record any bulge, pressure point or retrieval that requires removing unrelated items; change one variable at a time.
- Check the final outer dimensions against your actual booking and operating airline, including aircraft-specific information where supplied. Save the official page with your itinerary and recheck before departure.
Is it worth adding to your kit?
Consider it if
A shallow tote or slim backpack becomes awkward with bulky organizers.
Skip it if
Your current flat pouches already allow easy access and a comfortable carry.
COMPARE FEATURES, THEN CHECK THE LISTING
Explore the options
These are category search results, not a claim that every result fits this guide. Match dimensions, contents, care instructions, and seller details before choosing.
Search Amazon (paid link) ↗We may earn a commission from qualifying purchases. Prices and availability are shown by the retailer.
Common questions
Are flat pouches always lighter?
No. Materials, zippers and padding determine weight. Compare the actual product specification rather than the shape alone.
Can I stack several pouches?
Yes, but first test access. Several thin layers can still become one inconvenient block if every retrieval requires unpacking.
Sources and editorial scope
- Bellroy Desk Caddy ↗
- Eagle Creek Packing Organizers Guide ↗
- Delta Air Lines: Carry-On Baggage ↗
- Eagle Creek: Packing Organizers and Compression Bags Guide ↗
Primary references support the product-category examples and documented features. Fit exercises, buying decisions, and existing-gear alternatives are Practical Trail editorial guidance. References were reviewed for this guide on October 13, 2026; specifications and product versions can change. This article does not present independent test results.
How our guides are prepared →